
Example: Workflow Component
This article will show you how we've implemented zetbox.Workflow component. It will cover most of the features of zetbox.
Setting up the Project
Get the latest version of the zetbox Application Template (from github) and install it. Then, in Visual Studio, create a new zetbox Application:
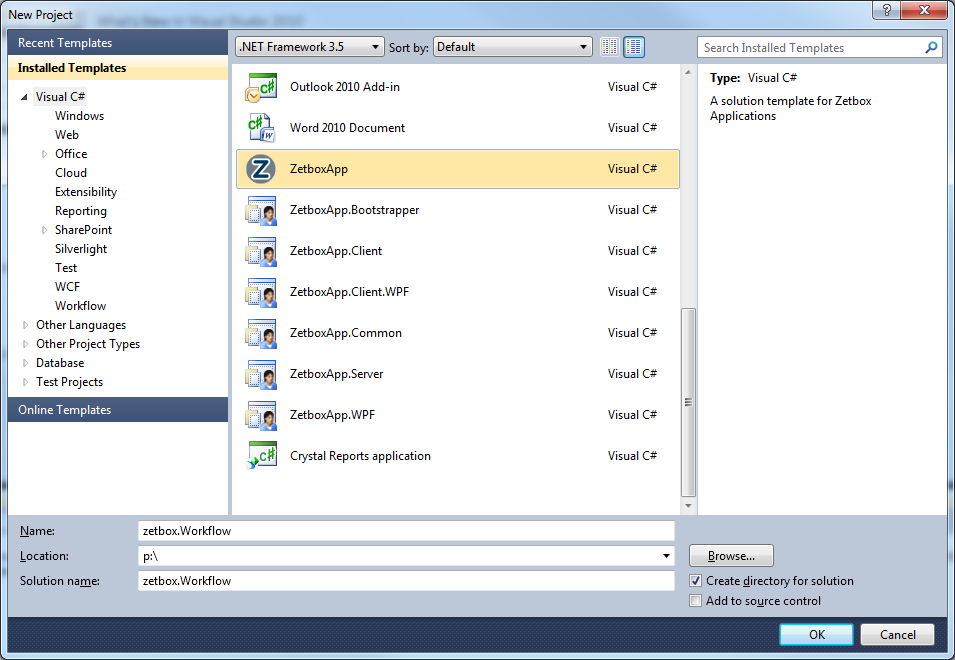
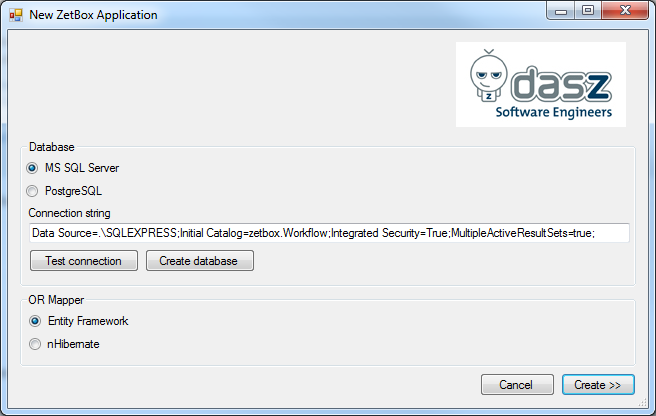
A wizard will open and ask you for the solution setup. Choose nHibernate or EF and MS SQL Server or PostgreSQL depending on your development environment. All combinations are valid, tested, supported, and can be changed in the configuration afterwards. The wizard will not create the database automatically. You can use the "Create database" to instruct the wizard to do so, or manually supply a connection string. Check that everything is correct by using the "Test connection" button. Finally hit "Create" and wait until Visual Studio has calmed down.
You will see a lot of failing references - don't worry, hit NuGet's "Package Restore" and compile the solution. This will install zetbox and all dependencies from the nuget repository. Later, NuGet will also ensure that you can upgrade to the latest versions and keep your dependencies straight.
One last reference will stay invalid - it's the Zetbox.Objects reference. This
is OK as we didn't generated any code yet. We will fix it. Get a shell, change
to the solution directory and execute zbResetAll.cmd:

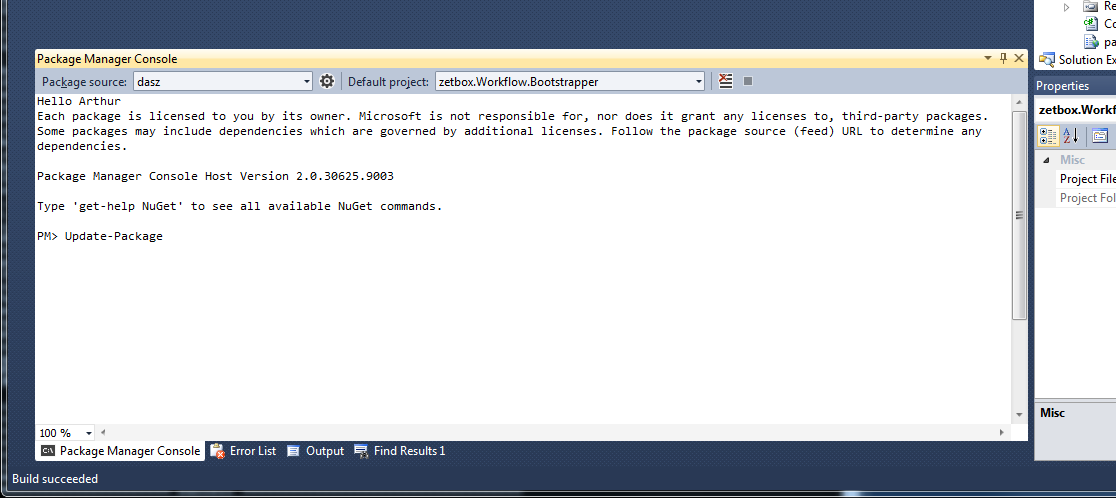
For upgrading to the latest zetbox version enter Update-Package in
the NuGet "Package Manager Console" and run ZbDeployAll.cmd from a
shell. This will fetch and install the newest version of all packages as well
as update your local database to the newest schema.
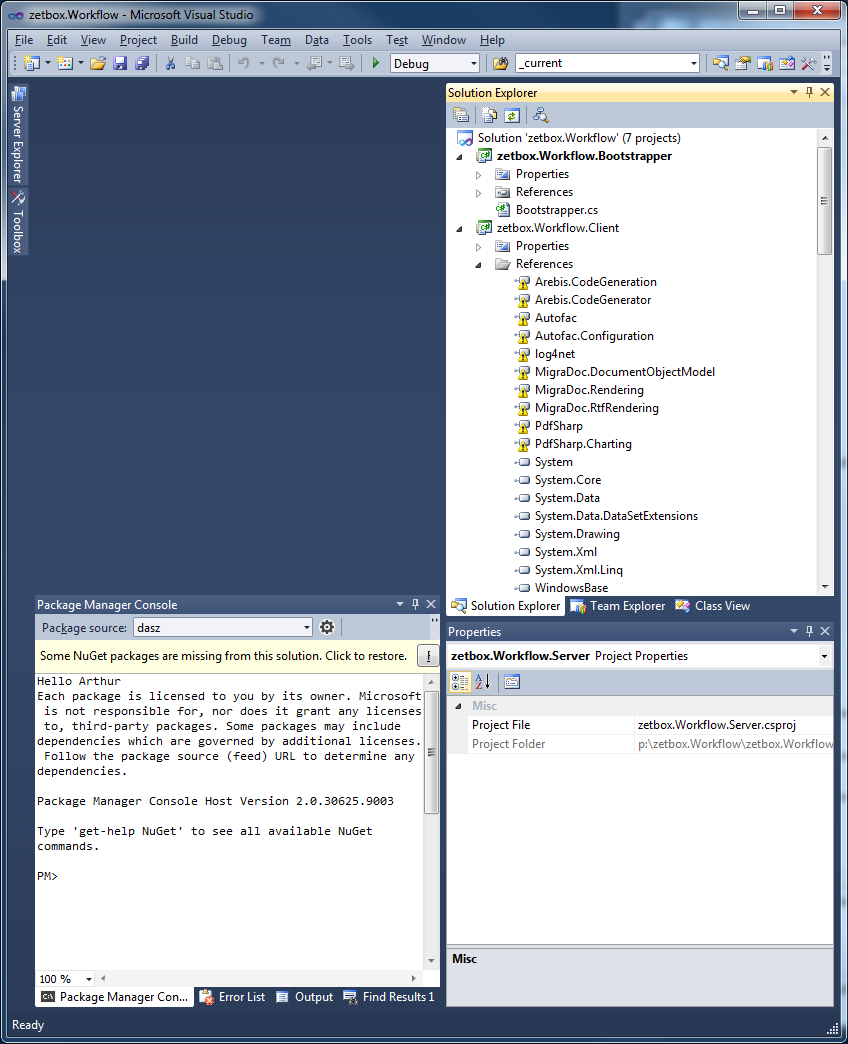
Compile the Solution. Setup is finished now. So, what did we get:
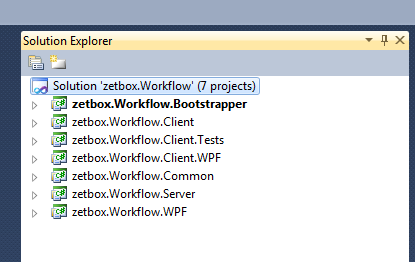
- zetbox.Workflow.Bootstrapper: Ignore this, we are working on a better deployment solution
- zetbox.Workflow.Client: An assembly containing all client side code. Here are all your ViewModels, Client actions and client side reporting templates
- zetbox.Workflow.Client.Tests: A test assembly for integration tests
- zetbox.Workflow.Client.WPF: An assembly containing all WPF Toolkit specific code. Here are all you WPF-Views
- zetbox.Workflow.Common: An assembly containing all common code (running on both the Server and the Client). Here are all your common definitions, ToString() actions and DTO's
- zetbox.Workflow.Server: An assembly containing all server side code. Here are all your server side actions and server side reports (like LinqCube)
- zetbox.Workflow.WPF: This is your main client executable. In this project you define your app icon and startup splash screen.
Let's have a look into the file system:
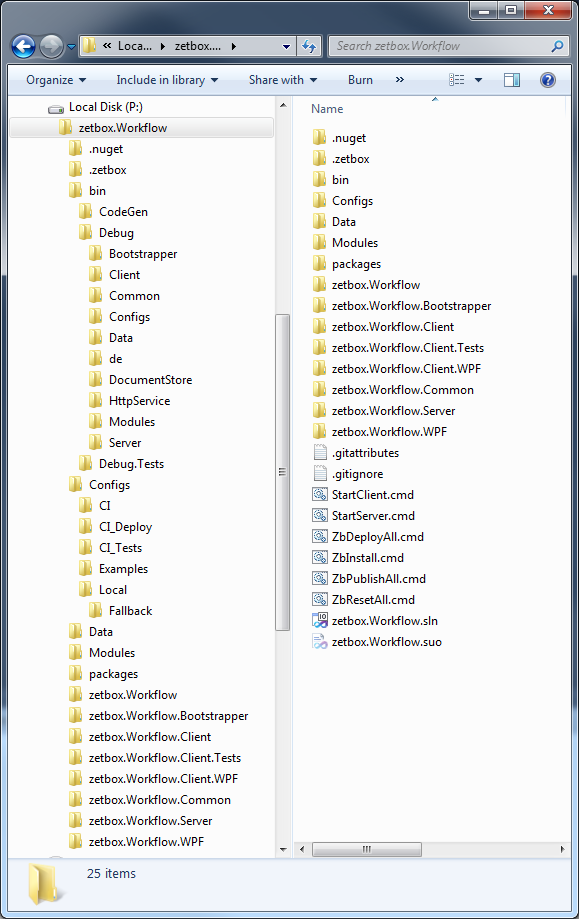
- .nuget: NuGet stuff
- .zetbox: Local deployment configuration and project targets. Will be updated by NuGet!
- bin\CodeGen: All generated Code and Assemblies are placed here (by zbResetAll & zbDeployAll)
- bin\Debug: Project output and install location of your local zetbox installation (by .zetbox\PrepareEnv.exe). This Folder can be deleted. Recreate it by compiling your solution. This will also do the same as zbInstall.cmd
- Configs: All zetbox specific configuration. Your local configuration resist in Local. all other configuration are used on the Continuous Integration Server. zbInstall will copy them to bin\Debug\Configs. The wizard has done it's Job and they are ready to use. We ignore them for now.
- Data: Your Application Data directory. To import or export data from your module, edit zbDeploy.cmd and zbPublish.cmd
- Modules: Besides source code this is the heart of your application. zbPublish.cmd will save the schema infomation here.
- packages: Destination for NuGet packages
- zetbox.Workflow: Can be deleted - the wizard will try to delete this folder, but it will fail.
- zetbox.Workflow.*: Your projects.
- StartClient.cmd: starts your local client
- StartServer.cmd: starts your local server
- ZbDeployAll.cmd: Import schema changes from
Models*.xml, ugrade the database and generate code. Optional import fromData*.xml - ZbInstall.cmd: Prepare your local environment (copy configs, copy zetbox binaries to bin\debug, etc..)
- ZbPublishAll.cmd: Export your schema to
Models*.xmland optional toData*.xml. Also upgrade the database with the latest changes and generate code - ZbResetAll.cmd: Delete your local database and do a fresh ZbDeployAll.cmd
Some other things to mention: communication between Server and Client is configured to use WCF with a HTTP Binding on URI http://localhost:6666/ZetboxService. Run this snippet as administrator to unblock the port - otherwise Windows will throw an error.
netsh http add urlacl url=http://+:6666/ user="YOURDOMAIN\Domain Users"
This is enough for now, let's start server and client:
    StartServer.cmd
    StartClient.cmd

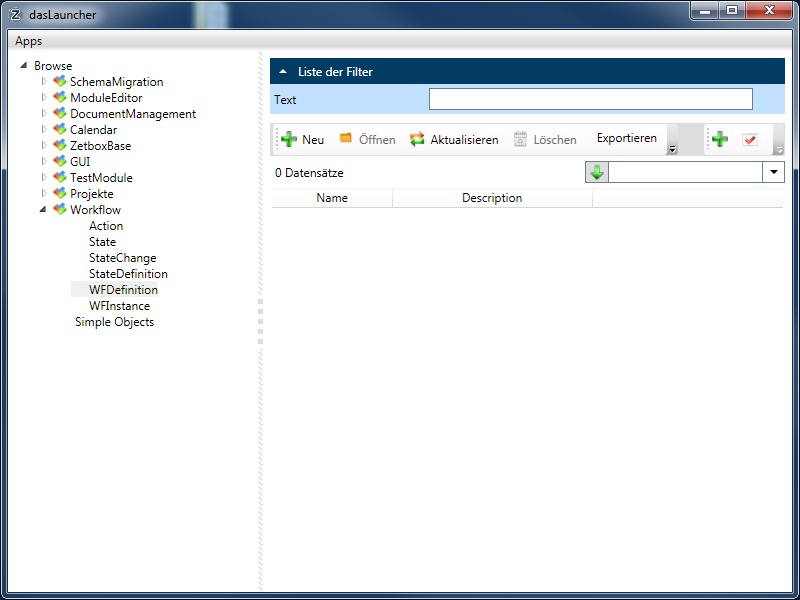
We are online :-) Let's create our module. Goto Apps -> Module Editor. The Module Editor will open:
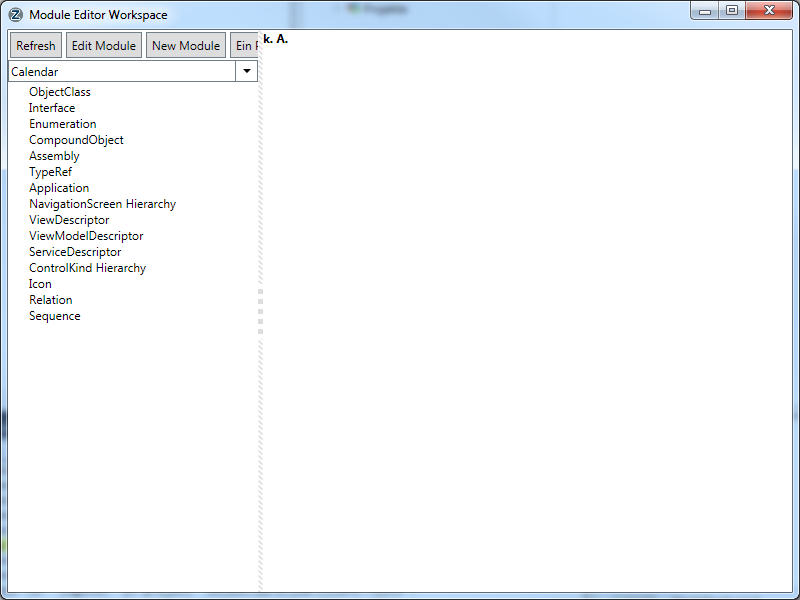
Creating a new Module
Hit "New Module" and fill out the form:
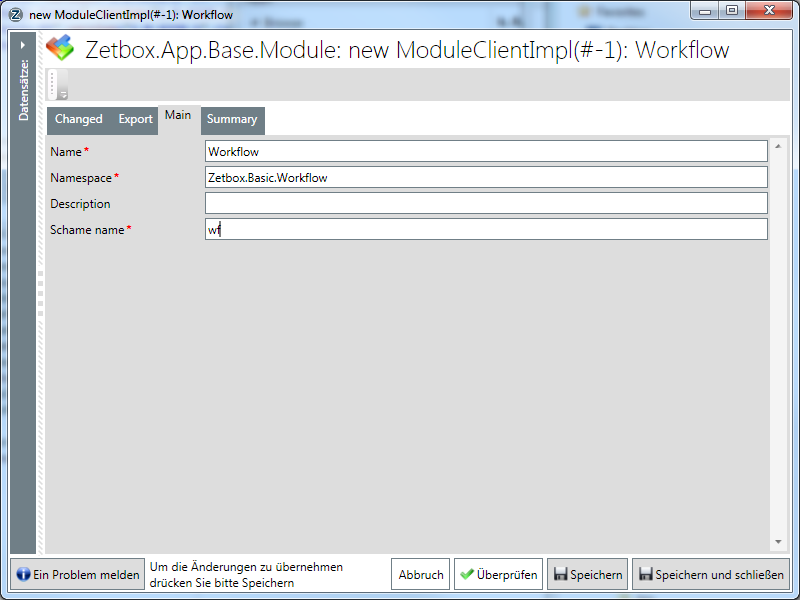
We recommend:
- Use a simple unique name for the module name.
- Use a C# namespace name containing your company. As we are the creators of Zetbox and are implementing a basic module, we use Zetbox.Basic as the namespace
- Use a hopefully unique database schema name. Not too long as some databases has some name length limitations.
VERY IMPORTANT: As the Module name does not match the project name (Zetbox.Workflow vs. Workflow) we have to edit zbPublishAll.cmd. Also remove export of the configuration module as it's not needed yet.
...
rem publish schema data for Workflow project
rem no config yet ;Workflow.Config
Zetbox.Server.Service.exe %config% -publish ..\..\Modules\Workflow.xml -ownermodules Workflow
IF ERRORLEVEL 1 GOTO FAIL
...
Sadly, you have to restart the Module Editor - it's a Bug, not a Feature :-( Select the "Workflow" Module.
Creating a Object Class
At this stage you should have drawn a UML Diagram and be aware of all needed Classes. In this case they are:
- WFDefinition: This is the definition of a Workflow. Instances are spawned from this class.
- StateDefinition: This is the definition of state within a Workflow.
- Action: A Action defines some code that can be executed by the user or by some other trigger. An Action will trigger a StateCange logic.
- StateChange: A StateChange logic will switch a Workflow instance to another state. They are triggered by Actions.
- WFInstance: This is a Instance of a Workflow definition. It has a attached object and a logfile
- State: An instance of a Workflow state.
Let's create the classes. Start zetbox and go to the Module Editor. Then choose "Object Classes" and hit "New" and fill out the basic fields:

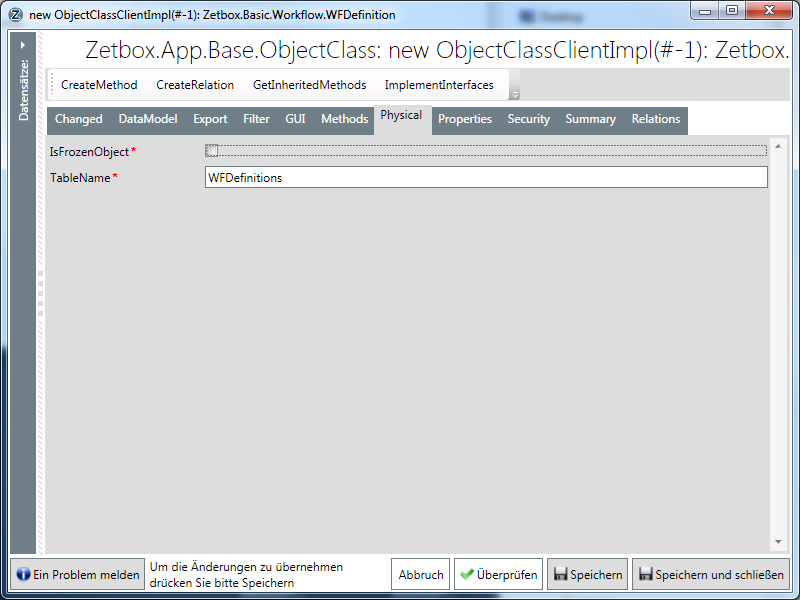
The physical table name should be the plural form of the class name. As the
Workflow definitions can be shared, they need to implement the interface
IModuleMember and IExportable. Also they can be
started from code so INamedObject is also a good idea.
IChangedBy is used for optimistic concurrency.
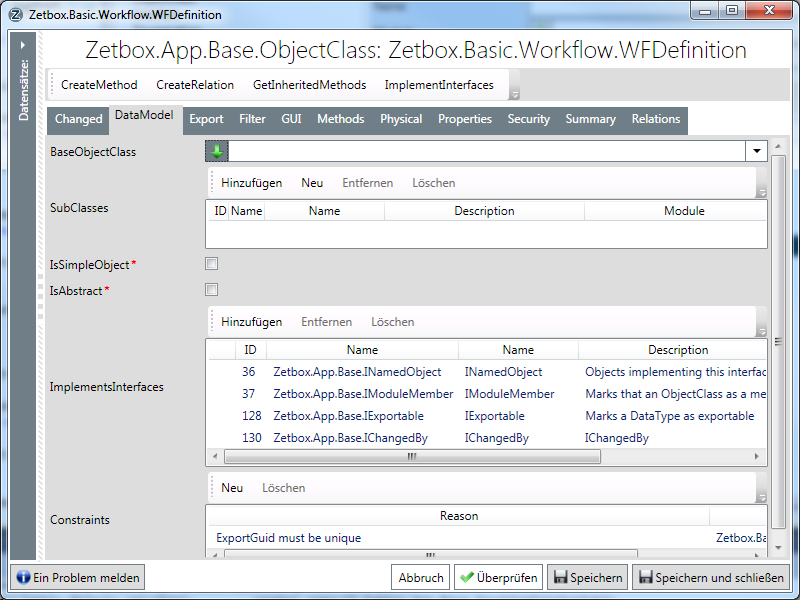
"ImplementInterfaces" will create all properties and constraints defined by the interfaces:
If you save, there will be some errors:
- Containment is not set - this is a bug. Change to nothing and then back to
Independent - Eagerloding is not set - the Module should be eager loaded, so set it to true
- Navigator should not have a NotNullConstrained - this is true, as the Module is optional. Delete that contstraint
Adding Properties
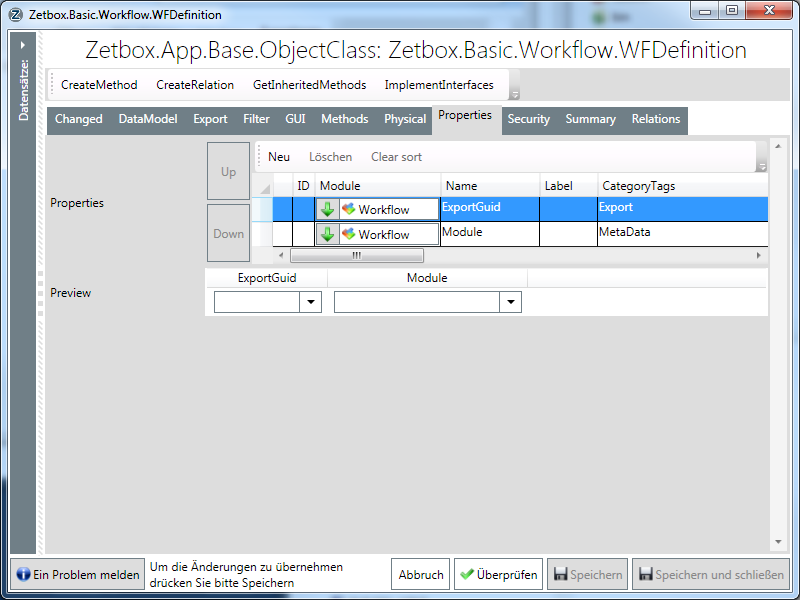
Now we add some more basic properties:
- Name: A unique (within the Module) name of the Workflow
- Description: A user friendly description
Go to Properties and hit "New". Then choose a "StringProperty":
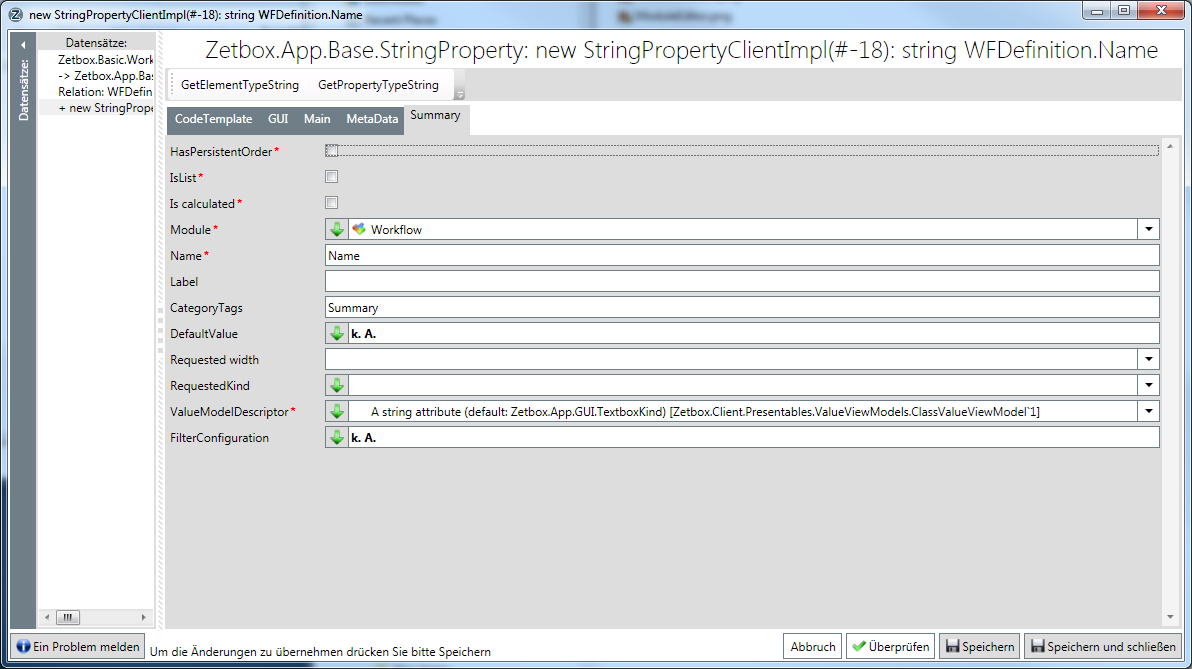
"Name" is OK, so we need not "Label" override. It's a member of the Workflow Module. It has the "Summary" Tag so the property will be shown in all lists. Everything else is fine, except the "StringRangeConstraint". Name should be 100 char long. Go to "Main" -> "Constraints" and add a new "StringRangeConstraint. MinLength is 0, MaxLength is 100. 0 is fine as we also add a "NotNullConstraint". Do the same for Description.
Implementing Methods
It's time for implementing some Methods. In Visual Studio add a simple class "WFDefinitionActions" in the Common Project under the Folder "Workflow". It is important that the class resists in the correct namespace, same as the module namespace and ends with "Actions". Also it must be decorated with a "Implementor" Attribute. If not AutoFac dependencies are needed, the class has to be static.

Each Method and ObjectClass has some code Templates. These can (and should) be copied into this class. We need this implementations:
using System;
using System.Collections.Generic;
using System.Linq;
using System.Text;
using Zetbox.API;

namespace Zetbox.Basic.Workflow
{
    [Implementor]
    public static class WFDefinitionActions
    {
        [Invocation]
        public static void ToString(WFDefinition obj, MethodReturnEventArgs<string> e)
        {
            e.Result = obj.Name;
        }

        [Invocation]
        public static void GetName(WFDefinition obj, MethodReturnEventArgs<string> e)
        {
            e.Result = obj.Module != null ? string.Format("Workflow.WFDefinitions.{0}.{1}", obj.Module.Namespace, Regex.Replace(obj.Name, "\\W", "_")) : null;
        }
    }
}
The ToString() implementation is a simple one - it's used as a display name for the instance. The GetName() implementation is important if Workflows should be created by code. See the NameObjects (TODO!!!!) documentation for details.
Don't worry about compiler errors. There is no code generated yet so every class is unknown yet. Before we will generate we should define all other classes. We'll skip that in this tutorial because it's the same as with the WFDefinition class.
Define Relations
Ten minutes later every class has been defined. Now it's time to define relations. Open the WFDefinition class and hit "CreateRelation":
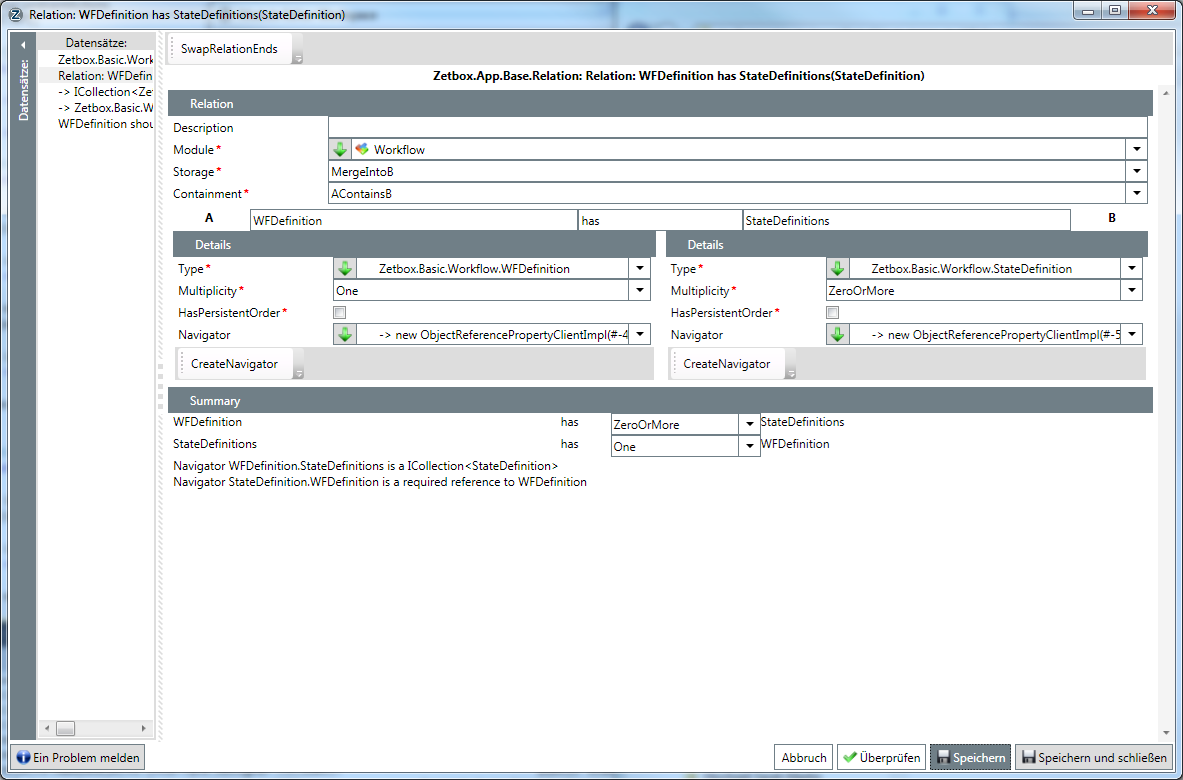
A WorkflowDefinition has zero or more StateDefinitions. Storage tells the relation where the foreign key should be persisted in the database. Containment tells zetbox how classes are related to each other. In this case, a StateDefinition has a tight relation to a Workflow Definition. "CreateNavigator" helps you to implement navigators on classes. We need both. Do the same for all other relations.
Publish and first startup
Everything is defined now - let's generate the code
zbPublishAll.cmd
The solution should compile now. If so, start the server and client.
Import missing assemblies
Sadly, the classes are not working correctly. zetbox does not know about our method implementors yet. We have to register our assemblies now. Go to the Module Editor -> Assembly and create 4 Assembly instances:
- zetbox.Workflow.Client, Version=1.0.0.0, Culture=neutral, PublicKeyToken=null
- zetbox.Workflow.Client.WPF, Version=1.0.0.0, Culture=neutral, PublicKeyToken=null
- zetbox.Workflow.Common, Version=1.0.0.0, Culture=neutral, PublicKeyToken=null
- zetbox.Workflow.Server, Version=1.0.0.0, Culture=neutral, PublicKeyToken=null
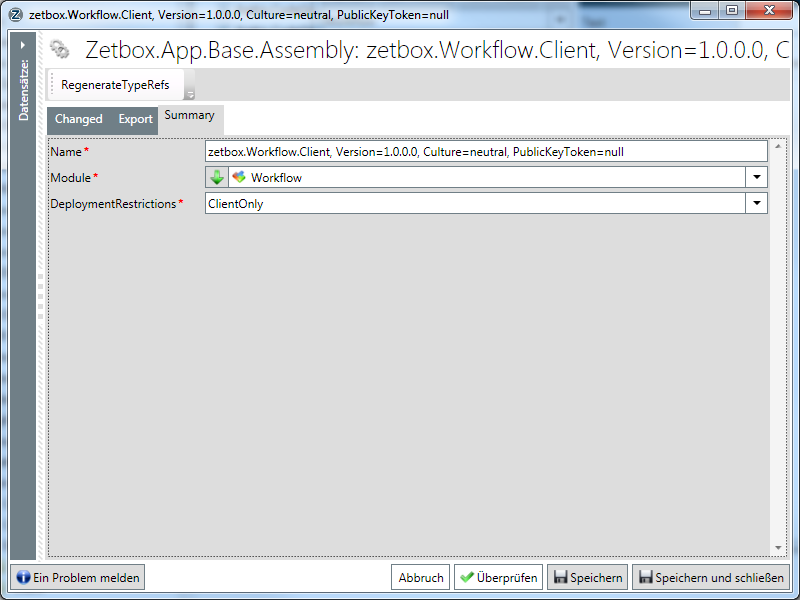
Be aware of the deployment restrictions! Publish again.
zbPublishAll.cmd
Now we can create and work with those objects now :-).
In our file system we have a new file and a new directory now: Modules\Wokflow.xml and \Modules\Workflow*. This is the schema information. It's a good time, to commit the changes to a source control system.
<?xml version="1.0" encoding="utf-8"?>
<ZetboxPackaging xmlns:ZetboxBase="Zetbox.App.Base" xmlns:GUI="Zetbox.App.GUI" date="2012-09-12T12:54:43.8627564Z" xmlns="http://dasz.at/Zetbox">
  <ZetboxBase:Module ExportGuid="e27c7e66-f806-4b0b-bf03-4e14efff5336">
    <ZetboxBase:ChangedOn>2012-09-11T16:24:20.3854716Z</ZetboxBase:ChangedOn>
    <ZetboxBase:CreatedOn>2012-09-11T16:24:20.3854716Z</ZetboxBase:CreatedOn>
    <ZetboxBase:Name>Workflow</ZetboxBase:Name>
    <ZetboxBase:Namespace>Zetbox.Basic.Workflow</ZetboxBase:Namespace>
    <ZetboxBase:SchemaName>wf</ZetboxBase:SchemaName>
  </ZetboxBase:Module>
  <ZetboxBase:ObjectClass ExportGuid="f33e0ab3-84ee-4543-90c1-a615191118d2">
    <ZetboxBase:ChangedOn>2012-09-12T09:33:07.8965219Z</ZetboxBase:ChangedOn>
    <ZetboxBase:CreatedOn>2012-09-12T09:33:07.8965219Z</ZetboxBase:CreatedOn>
    <ZetboxBase:Description>A Action defines some code that can be executed by the user or by some other trigger. An Action will trigger a StateCange logic</ZetboxBase:Description>
    <ZetboxBase:Module>e27c7e66-f806-4b0b-bf03-4e14efff5336</ZetboxBase:Module>
    <ZetboxBase:Name>Action</ZetboxBase:Name>
    <GUI:ShowIconInLists>false</GUI:ShowIconInLists>
    <GUI:ShowIdInLists>false</GUI:ShowIdInLists>
    <GUI:ShowNameInLists>false</GUI:ShowNameInLists>
    <GUI:DefaultViewModelDescriptor>d8e95ac5-d46a-4dfa-a574-12ea299eadc4</GUI:DefaultViewModelDescriptor>
    <ZetboxBase:IsAbstract>false</ZetboxBase:IsAbstract>
    <ZetboxBase:IsFrozenObject>false</ZetboxBase:IsFrozenObject>
    <GUI:IsSimpleObject>false</GUI:IsSimpleObject>
    <ZetboxBase:TableName>Actions</ZetboxBase:TableName>
  </ZetboxBase:ObjectClass>
  ...
We are creating a TestWorkflow now. Two States and some Actions. Actions are defined global so they can be reused. Create them and use them in your test workflow.
As we have some test data now, we can enable export of this data. Uncomment these lines in "zbPublishAll.cmd"
Zetbox.Server.Service.exe %config% -export ..\..\Data\Workflow.Data.xml -schemamodules Workflow -ownermodules Workflow
IF ERRORLEVEL 1 GOTO FAIL
To re-import the test data add this to zbDeployAll.cmd
Zetbox.Server.Service.exe %config% -import ..\..\Data\Workflow.Data.xml
IF ERRORLEVEL 1 GOTO FAIL
Now we have everything we need: A working Database, source control, a basic module, a basic implementation, import/export of data, schema management.... We continue with the implementation now.
Calculated properties, getter & setter
Some interesting details:
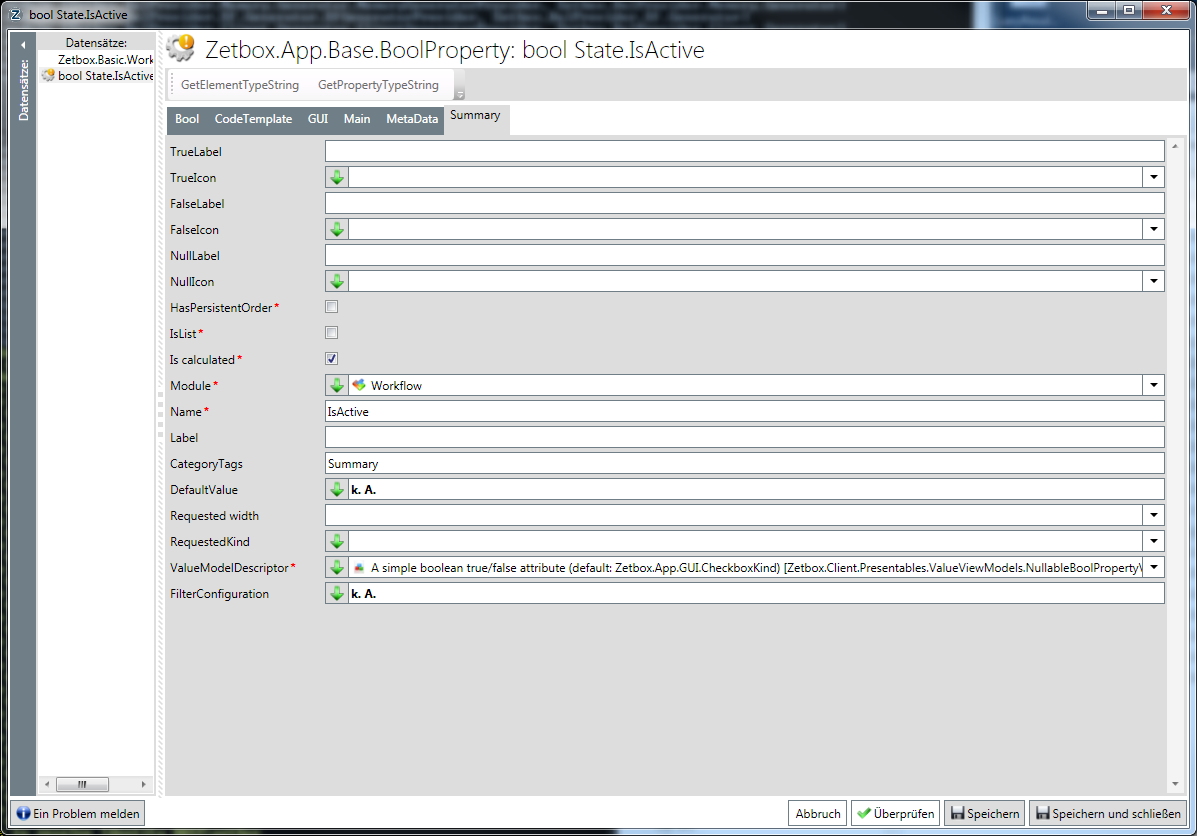
State.IsActive is a calculated property. A state is active, when LeftOn is null. The implementation is:
[Invocation]
public static void get_IsActive(State obj, PropertyGetterEventArgs<bool> e)
{
    e.Result = obj.LeftOn == null;
}

[Invocation]
public static void postSet_LeftOn(State obj, PropertyPostSetterEventArgs<DateTime?> e)
{
    obj.Recalculate("IsActive");
}
Please note the post setter for LeftOn - it signals zetbox to reevaluate IsActive. We've implemented this property because IsActive is more precise than filtering on LeftOn == null. It's the same, but tells more. Calculated properties has the advantage, that they are persisted. That's why it's so important to call Recalculate().
A workflow instance can only be initialized once with a workflow definition object. To ensure that, we've implemented these lines of code. That's not everything, we will prevent the user from setting this property later in our ViewModels. But it's good for safety.
[Invocation]
public static void preSet_Workflow(WFInstance obj, PropertyPreSetterEventArgs<Zetbox.Basic.Workflow.WFDefinition> e)
{
    if (e.OldValue == null) return; // OK
    if (e.OldValue != e.NewValue) throw new NotSupportedException("Changing the workflow is not supported");
}
The Workflow will be initialized by calling the Start() method - that's our entry point:
[Invocation]
public static void Start(WFInstance obj, Zetbox.Basic.Workflow.WFDefinition workflow)
{
    if (workflow != null)
    {
        // ....
    }
}
ViewModels and Views
When we look at a state instance, that's the users ToDo item, we see, that it's not really usable. Let's create a ViewModel and a View.
When you've installed our code templates, you should find a ViewModel C# template. It should be located in a "ViewModel\Workflow" folder in you Client project.

The code should look like this:
namespace zetbox.Workflow.Client.ViewModel.Workflow
{
    using System;
    using System.Collections.Generic;
    using System.Linq;
    using System.Text;
    using Zetbox.Client.Presentables;
    using Zetbox.API;
    using Zetbox.Basic.Workflow;

    [ViewModelDescriptor]
    public class StateViewModel : DataObjectViewModel
    {
        public new delegate StateViewModel Factory(IZetboxContext dataCtx, ViewModel parent, IDataObject obj);

        public StateViewModel(IViewModelDependencies appCtx, IZetboxContext dataCtx, ViewModel parent, State obj)
            : base(appCtx, dataCtx, parent, obj)
        {
            State = obj;
        }

        public State State { get; private set; }

        public override string Name
        {
            get { return State.ToString(); }
        }
    }
}
The ViewModel is derived from a DataObjectViewModel - this is the default ViewModel, when DataObjects are displayed.
Create a WPF-UserControl "StateEditor.xaml". It should be located in a Folder "View\Workflow" in your Client.WPF project. It looks like that:
<UserControl x:Class="zetbox.Workflow.Client.WPF.View.Workflow.StateEditor"
             xmlns="http://schemas.microsoft.com/winfx/2006/xaml/presentation"
             xmlns:x="http://schemas.microsoft.com/winfx/2006/xaml"
             xmlns:mc="http://schemas.openxmlformats.org/markup-compatibility/2006"
             xmlns:d="http://schemas.microsoft.com/expression/blend/2008"
             xmlns:ctrls="clr-namespace:Zetbox.Client.WPF.CustomControls;assembly=Zetbox.Client.WPF.Toolkit"
             xmlns:client="clr-namespace:Zetbox.Client.Presentables;assembly=Zetbox.Client"
             mc:Ignorable="d"
             d:DesignHeight="300" d:DesignWidth="300">
    <DockPanel>
        <DockPanel DockPanel.Dock="Top"
                   Margin="{StaticResource AreaGroup1Margin}">
            <Image DockPanel.Dock="Left"
                   Source="{Binding Converter={StaticResource ImageConverter}}"
                   Width="{StaticResource BigControlHeight}"
                   Height="{StaticResource BigControlHeight}" />
            <TextBlock Text="{Binding LongName}"
                       Style="{StaticResource zbTitle}"
                       Margin="10 0 0 0"
                       HorizontalAlignment="Left" />
        </DockPanel>

        <ToolBarTray DockPanel.Dock="Top">
            <ctrls:WorkaroundToolBar ItemsSource="{Binding Actions}">
                <ctrls:WorkaroundToolBar.Resources>
                    <DataTemplate DataType="{x:Type client:ActionViewModel}">
                        <ctrls:CommandButton CommandViewModel="{Binding}"
                                             Style="{StaticResource ImageToolbarButton}" />
                    </DataTemplate>
                </ctrls:WorkaroundToolBar.Resources>
            </ctrls:WorkaroundToolBar>
        </ToolBarTray>

        <TabControl Style="{StaticResource AreaGroup1TabControl}"
                    HorizontalContentAlignment="Stretch">
        </TabControl>
    </DockPanel>
</UserControl>
namespace zetbox.Workflow.Client.WPF.View.Workflow
{
    using System;
    using System.Collections.Generic;
    using System.Linq;
    using System.Text;
    using System.Windows;
    using System.Windows.Controls;
    using System.Windows.Data;
    using System.Windows.Documents;
    using System.Windows.Input;
    using System.Windows.Media;
    using System.Windows.Media.Imaging;
    using System.Windows.Navigation;
    using System.Windows.Shapes;
    using Zetbox.Client.GUI;
    using zetbox.Workflow.Client.ViewModel.Workflow;

    /// <summary>
    /// Interaction logic for StateEditor.xaml
    /// </summary>
    [ViewDescriptor(Zetbox.App.GUI.Toolkit.WPF)]
    public partial class StateEditor : UserControl, IHasViewModel<StateViewModel>
    {
        public StateEditor()
        {
            InitializeComponent();
        }

        public StateViewModel ViewModel
        {
            get { return (StateViewModel)DataContext; }
        }
    }
}
The XAML is the basic skeleton of a "normal" Data Object Editor. Within the
TabControl we will later put our controls to display. In the code behind of the
XAML we simply implement "IHasViewModel". This is not necessary (yet) but
you'll love the F12 feature 
ControlKinds
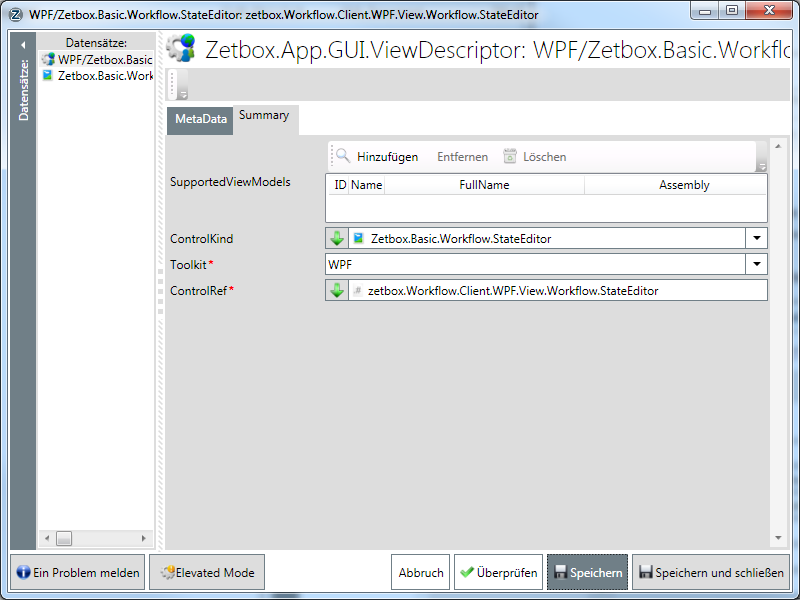
Compile, start zetbox and go to "Module Editor" -> Assemblies. Select both Assemblies and Hit "Refresh Typerefs". Two Workspaces should open. One for the new View and one for the new ViewModel. In one of them, create a new ControlKind and set the same in the other one. The Control Kind must have "Zetbox.App.GUI.DataObjectKind" as parent.
Wiring ObjectClass and ViewModels
Now go to the State Class and set the newly created ViewModel for the object.

To sum up: Each object is wrapped in a view model - even each property. Nearly everything. zetbox is following the MVVM Pattern. Each ViewModel is Toolkit independent. It is not responsible for displaying an object. It's only responsible to create a infrastructure for displaying. A Control Kind is a description on how a view model would like to be displayed. But it's just a wish. e.g. a Bool Property wish to be displayed as a checkbox, another bool property could wish to be displayed as a dropdown. Each Toolkit (WPF, WinForms, ASP.NET, etc.) has views. Each view is telling zetbox, what kind of view (control) it is. And here is the connection: A View tells, "I'm able to display this ControlKind". If a View is not present, zetbox will fallback to the next basic view.
zbPublishAll.cmd
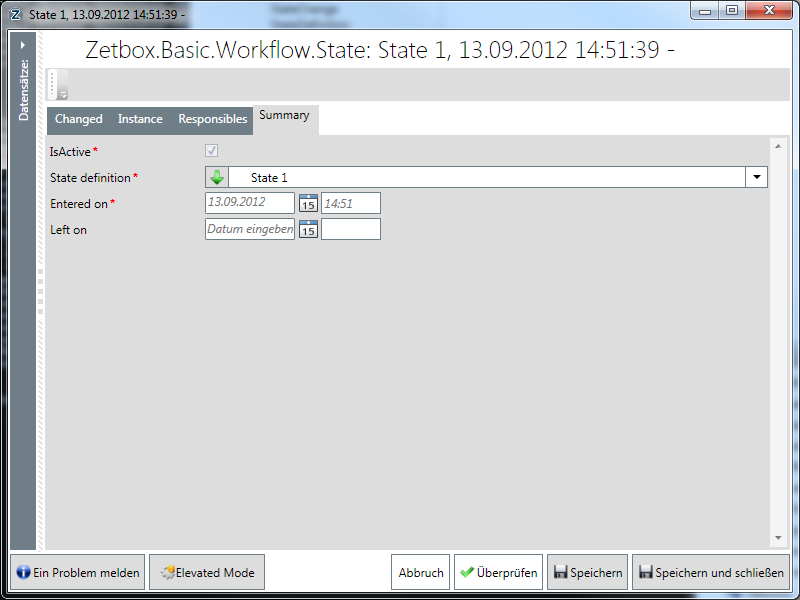
Start server and client and your state object should look like this:
![]()
Placing widgets
It's empty. We have to continue implementation...
public DataObjectViewModel InstanceViewModel
{
    get
    {
        return DataObjectViewModel.Fetch(ViewModelFactory, DataContext, this, State.Instance);
    }
}

protected override System.Collections.ObjectModel.ObservableCollection<ICommandViewModel> CreateCommands()
{
    var commands = base.CreateCommands();
    foreach (var action in State.StateDefinition.Actions)
    {
        commands.Add(ViewModelFactory.CreateViewModel<SimpleCommandViewModel.Factory>().Invoke(DataContext, this, action.Name, action.Description, () => InvokeAction(action), null, null));
    }
    return commands;
}

public void InvokeAction(wf.Action action)
{
    // TODO:
}
<UserControl x:Class="zetbox.Workflow.Client.WPF.View.Workflow.StateEditor"
             xmlns="http://schemas.microsoft.com/winfx/2006/xaml/presentation"
             xmlns:x="http://schemas.microsoft.com/winfx/2006/xaml"
             xmlns:mc="http://schemas.openxmlformats.org/markup-compatibility/2006"
             xmlns:d="http://schemas.microsoft.com/expression/blend/2008"
             xmlns:ctrls="clr-namespace:Zetbox.Client.WPF.CustomControls;assembly=Zetbox.Client.WPF.Toolkit"
             xmlns:client="clr-namespace:Zetbox.Client.Presentables;assembly=Zetbox.Client"
             mc:Ignorable="d"
             d:DesignHeight="300"
             d:DesignWidth="300">
    <DockPanel>
        <DockPanel DockPanel.Dock="Top"
                   Margin="{StaticResource AreaGroup1Margin}">
            <Image DockPanel.Dock="Left"
                   Source="{Binding Converter={StaticResource IconConverter}}"
                   Width="{StaticResource BigControlHeight}"
                   Height="{StaticResource BigControlHeight}" />
            <TextBlock Text="{Binding LongName}"
                       Style="{StaticResource zbTitle}"
                       Margin="10 0 0 0"
                       HorizontalAlignment="Left" />
        </DockPanel>

        <ToolBarTray DockPanel.Dock="Top">
            <ctrls:WorkaroundToolBar DockPanel.Dock="Top"
                                     ItemsSource="{Binding Commands}">
                <ctrls:WorkaroundToolBar.Resources>
                    <DataTemplate DataType="{x:Type client:CommandViewModel}">
                        <ctrls:CommandButton CommandViewModel="{Binding}"
                                             Style="{StaticResource ImageToolbarButton}" />
                    </DataTemplate>
                </ctrls:WorkaroundToolBar.Resources>
            </ctrls:WorkaroundToolBar>
        </ToolBarTray>

        <TabControl DockPanel.Dock="Top"
                    Style="{StaticResource AreaGroup1TabControl}"
                    HorizontalContentAlignment="Stretch">
            <TabItem Header="Summary">
                <StackPanel>
                    <ctrls:LabeledView DataContext="{Binding InstanceViewModel.PropertyModelsByName[Summary]}" />
                    <ctrls:LabeledView DataContext="{Binding InstanceViewModel.PropertyModelsByName[Message]}" />
                </StackPanel>
            </TabItem>
            <TabItem Header="Log">
                <StackPanel>
                    <ctrls:LabeledView DataContext="{Binding InstanceViewModel.PropertyModelsByName[LogEntries]}" />
                    <ctrls:LabeledView DataContext="{Binding InstanceViewModel.PropertyModelsByName[States]}" />
                </StackPanel>
            </TabItem>
        </TabControl>

        <GroupBox Header="Payload">
            <StackPanel>
                <ctrls:LabeledView DataContext="{Binding InstanceViewModel.PropertyModelsByName[Payload]}" />
                <ContentPresenter Content="{Binding InstanceViewModel.PropertyModelsByName[Payload].ReferencedObject}"
                                  ContentTemplateSelector="{StaticResource defaultTemplateSelector}" />
            </StackPanel>
        </GroupBox>
    </DockPanel>
</UserControl>
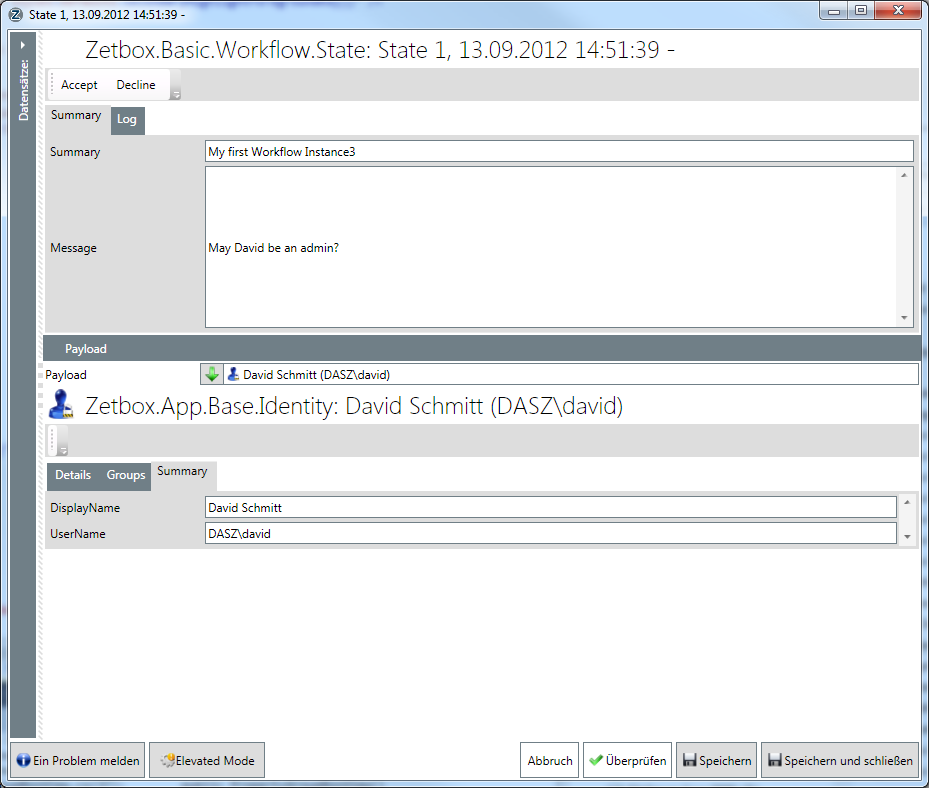
Much better:
Summary
In this article we have covered the most important features and tasks of our zetbox, namely
- Setting up the Project
- Creating a new Module
- Creating a Object Class
- Adding Properties
- Implementing Methods
- Define Relations
- Publish Module definition
- Calculated properties, getter & setter
- ViewModels and Views
We hope, that we have put some light on how to work with our zetbox.